
Have you tried submitting Adsense approval again and again but never gets approval? Have you got frustrated by keeping changes to your website but still cannot comply your site with Adsense policies? Do you think you have a blog which follows full Adsense criteria but still Adsense keeps rejecting your application each time? If YES, then you're at a right place. Today I am going to share the most awaited Adsense Approval trick by which each and every blogger can get Google Adsense Approved Account by putting little efforts. I found people selling Adsense accounts at high prices and there's no way out for people who can't get Adsense approval so they agree to buy Adsense accounts at high prices. You can see such people on Facebook Buy and Sell groups. This is totally unfair for the one who has a good blog but no money to buy accounts and can monetize his/her contents. So, I will share the best Adsense Approval trick which I discovered a few days back. So without wasting much time, let's move on to the tutorial.
Google Adsense Approval Trick by BBeginner:
Follow the step by step guide to get your Adsense account approved in your first attempt. Remember, this will take some time to follow these steps. But once you are done creating such blog, you can get unlimited Adsense approvals through the same blog. I will tell you the method to get unlimited approvals at the end of this post.
- First of all, you need a Blogger.com blog. Create a new Gmail account and sign up for Blogger.
Check: How to create a Free blog on Blogger?
- Choose default Blogger templates only to give a simple look. I recommend Notable, Simple or Ethereal.

- After doing so, you need to set-up .tk custom domain on your Blogger blog (which is provided by Freenom for free). Read this: How to setup Freenom as Blogger custom domain?
Remember: Freenom provides many domain extensions like .tk, .ml, .ga but you have to choose .tk only and choose a brandable domain name for tech niche only. Tech niche has the most chances for approval. So choose it as it is the part of the trick. - Now, after setting your custom domain, publish at least 20 articles for Tech niche. As this is a trick, you don't need to worry about writing contents. Simply go to EzineArticles or any article source and copy the articles, spin and published them on your blog.
Remember: You need to publish these articles by scheduling them for past dates. (The oldest post must be published before 6 months, so publish it wisely by scheduling it for 6 months old date)
Check this guide: How to schedule posts in Blogger? - After that, simply create these 5 Pages:
> Privacy Policy
> Disclaimer
> Contact Us
> Sitemap
> About Us Page - Most Important
(You can copy Privacy, Disclaimer pages by editing names and URLs but you have to create About Us page by your own in your genuine words, telling about the goodness of your blog in around 200-300 words)
- Make sure to add Pages gadget besides header or above posts so that it can be accessed easily and will be present above the fold of your blog.
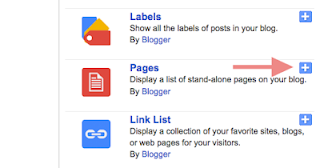
You can do the same by Layout Tab of your blog > Click Add a Gadget link on Sidebar > Select Pages Option and Click Save. After saving, drop the gadget above posts or beside header accordingly to space in your blog's template. - The important thing, make sure to Add Meta Description in your blog. Trust me, it really matters for Adsense.
Check: How to Add Meta Description in Blogger? - Now your blog is ready :)
Additional Work:
- Ping your blog through Pingomatic.com and leave your blog for around 2-3 days to let search engines to index your blog properly. Alternatively, you can verify your blog on Google Search Engine Console and submit your sitemap and index your posts in Google by using Fetch as Google option.
In this time period, make sure to share your blog posts on social media to get some traffic or else you can use EasyHits4U traffic exchange service. This worldwide traffic service will help you in getting approval easily.
Note: Use EasyHits4U until you get approval. Don't use it after approval as this can be harmful in long run. - Once your blog posts will index in Google then you're ready to get Adsense approval.
Now, Apply for Adsense genuinely and wait for partial-review. After partial review, you have to create one ad-unit and add it to your blog.
You will need traffic badly at this time so keep sharing your posts on social media and obviously, EasyHits4U will also help.
Wait for Adsense review and you will see Adsense ads dancing on your website :)
Just sign-up for another Freenom domain and setup it as the custom domain on the same blog. Don't forget to change, Blog Titles and edit the pages and wait few days to let search engines crawl new URLs.
Yippie :) You will get Adsense approval again and again by following these steps.
If you face any difficulty or have any doubt, let me know in comments or via Contact Page. I will surely help you as soon as I could. Be happy and enjoy your Adsense :)
You will need traffic badly at this time so keep sharing your posts on social media and obviously, EasyHits4U will also help.
Wait for Adsense review and you will see Adsense ads dancing on your website :)
Method for Unlimited Approvals:
As I told above, that you need to invest the time to create the blog only once. After one approval, you can create unlimited Adsense accounts.Just sign-up for another Freenom domain and setup it as the custom domain on the same blog. Don't forget to change, Blog Titles and edit the pages and wait few days to let search engines crawl new URLs.
Yippie :) You will get Adsense approval again and again by following these steps.
If you face any difficulty or have any doubt, let me know in comments or via Contact Page. I will surely help you as soon as I could. Be happy and enjoy your Adsense :)


11 comments:
gud idea! but expected too much
@Pubclub India
Thanks Buddy! Yes, the trick needs time but once you are done creating blog you can use the unlimited approval trick again and again from the same blog. Creating such blog will takes few hours in first go only.
Great
Awesome
Now thats what i was looking for! Am gonna try this right away. thanks bro.
Can you check my site www.take90.ml and give me feedback? Been waiting for AdSense for days now but nothing is still showing. Thank you.
Hello Buddy!
Your blog is nice but note that .ml extensions has lower approval rate than .tk blogs so .tk is recommended.
Anyway you can give a try by implementation these steps on your blog:
1. Putting Pages Widget Above the Posts instead of sidebar.
2. Removing Flag Counter widget for now. You can add it back after approval.
3. After submitting your Adsense approval application, make sure to drive some social traffic and use EasyHits4U.
This will surely help you to get approval.
Good Luck :)
nice post brother.
good luck together.
Thanks For This Adsense Approval Trick..Really Helpful Post For New Bloggers
Hi Hammad Ansari, thank you for your suggestions. Apparently it just took a while because my site is not yet compliant to their terms and conditions. AdSense already approved it today and I can already use any custom domain names.
Congrats for your Adsense approval :)
Stay Connected.
We love comments! We appreciate your queries but to protect from being spammed, all comments will be moderated by our human moderators. Read our full comment policy here.
Let's enjoy a happy and meaningful conversation ahead!